Fáilte!

The people we choose to share our ups and downs with in life are our best friends, our confidants.

Thursday, January 6, 2011

La Parmigiana di Pollo

There’s nothing more disappointing than going out to dinner and ordering an all around favorite, chicken parmigiana, and being let down with how it tastes. I love this dish, it’s in fact one of my favorites, but recently I’ve been disappointed with the quality that I’ve gotten when at restaurants.  Not only t hat, but David and I wanted to stop going out so much because it’s sooo expensive. So, this entrée disappointment only made me more determined to see if I could create meals that would be better than the restaurant quality, which would make staying in easier to do. Granted we’ve gone to restaurants in the area I could NEVER complain about because they were so wonderful, but they tend to be the more pricey establishments and we can’t always afford to roll that way. And that is how I ended up with this winner of a dinner.
Chicken Parmigiana
·        2 eggs
·        ¼ c milk
·        2 ¼ c breadcrumbs
·        1 tbsp flour
·        2 tsp garlic powder
·        1 tbsp parsley
·        4 tbsp oil
·        4 chicken breasts, pounded thin (approx. ½ ” thick)
·        Pasta sauce
·        Mozzarella cheese or any preferred type

1.     Beat eggs and then add the milk. In a separate bowl, mix the breadcrumbs, flour, garlic, and parsley.
2.     Heat oil in a pan over medium heat. Soak the chicken breasts in the egg/milk mixture, then dredge in the breadcrumb mix. I think it’s best to double bread these, so I would then soak it again (quickly) then dredge again in the breadcrumbs.
3.     Put in pan and brown it well, otherwise, the breading will stick to the pan and not the chicken breast.
4.     While the chickens are cooking in the pan, boil the pasta. Drain the pasta  when it’s al dente. Mix in the pasta sauce into the noodles, or you can reserve it to ladle just on top of the chicken.
When the chicken is done you can start assembling plates to serve. Put noodles/sauce on plate, and top with a piece of chicken. You can add some cheese on top of each breast for the last few minutes to melt. Serve and enjoy!


Marie! The baguettes, hurry up!

Yeah, when I was making these I couldn’t help but think about the beginning of Beauty and the Beast movie with the Baker yelling to Marie to hurry up with the baguettes! It made me smile while I baked =)

-          2 ½ c flour (bread flour is ideal because of the extra gluten, but all purpose works just fine)
-          1 tsp salt
-          1 tbsp sugar
-          1 c warm water
-          2 tsp dry active yeast
-          6-8 cloves or ½ head roasted garlic, instructions below – optional

1.      To roast garlic: preheat oven to 350 degrees F. If you have individual cloves cut off just the tops and then put it in a pan with a generous dollop of olive oil, some water to mix into it, and sprinkle on salt and fresh cracked pepper. If you have a head of garlic you could just slice the top off the whole head and put it into the pan with the olive oil and fill the water a third way up the head. Add the salt and pepper to top. Cover with foil and bake for 45 min- 1 hour. When done take it out of the ‘shells’ by squeezing the closed end of the clove.
2.      Put the warm water in a bowl and add the yeast to it. Then add the sugar (to feed the hungry buggers!) Let sit 20-30 minutes, I usually do this and walk away doing other things. You want to get it all foamy on top. If it’s cold in the room try to put it near something warm, like your oven or stove top if you’re using it, because it may take the yeast a little more time to get where you want it.
3.       Mix the flour (you can sift, I don’t because I don’t have a sifter and it works fine) with the salt in a Kitchenaid bowl. Add in the roasted garlic cloves and yeast mix and start a 10 minute timer for kneading when the dough starts to come together. (The garlic cloves, if using, will disintegrate into the dough so there shouldn’t be big chunks of garlic throughout the bread, and even though it sounds like a lot of garlic, roasted garlic has a much mellower flavor so it won’t be overpowering.)
4.      After kneading 10 minutes, form into a smooth ball. It should be just a little tacky. Let rise in an oiled bowl that’s covered with a towel for 1 hour. Again if the room is cold I would suggest putting it near something warm to help it rise.
5.      After the hour punch it down and pull out of the bowl. Cut the dough into half. Now you can form it one of two ways. If you don’t care if there’s air bubbles in the dough (holes when you slice it) then you could just easily roll with your hands into a long “rope-like” shape and be done. Or if you don’t want holes because it’ll be used for bruschetta or dipping and such then I suggest rolling it out with a rolling pin into a rectangular shape (it doesn’t have to be perfect) and on the long end start to roll it tightly into a “rope-like” shape. Gently roll the ends to get them to taper slightly. They look really thin for bread at this point, but its okay! Place them on your baking sheet of preference and separate by at least 3” and cover with a hand towel (near a warm place) and let rise another 45 min- 1 hour.
6.      When you have about 25-30 min left to rise I suggest preheating your oven to 450 degrees F because even though your oven may say it’s reached that temp quicker than that, stoves are usually off a lot in temp and so giving it this extra time helps get it actually to this high temp. Although this may not always be true, but our stove is old and I have found it to be true for us...
7.      When you’re done rising quickly place the bread in the oven on a middle keeping the door open for as little as possible so the temperature stays constant as much as possible.
8.      Then put the 1 c hot water into a broiler pan or oven safe pot. And again quickly put into the oven on a lower rack. This part is only necessary if you want that characteristic baguette crust.
9.      Bake for 15-18 minutes (I tend towards 15 minutes in my oven because that’s when it’s golden brown), but keep an eye on it because it’ll brown really dark if you don’t.
When done take out of the oven and cool somewhat before slicing.
Our favorite is to toast slices of this for bruschetta or a spinach and artichoke dip, mmmm dreamy….

David's Birthday Celebration

We usually have some type of get together for celebrations and I always make some type of appetizers or meal for it, but for this one I wanted to make dishes that David loved. Appetizer Meatballs happened to be one of David’s favorites, and it’s one of his Gramma’s recipes. Now I am not usually a fan  of this type of recipe, but I have to admit these were pretty good. So I gathered the ingredients and set to work.
*Makes approx. 61-65 (1”) meatballs
**This recipe makes 1 ½ quarts of sauce
-          3 lbs ground beef
-          1 c minced onion
-          3 eggs
-          3 tsp salt
-          1 ½ tsp Worcestershire sauce
-          1 ½ c bread crumbs
-          1 ½ c milk
-          3 tbsp parsley, chopped or dry
-          ¼ + 1/8 tsp black pepper
-          36 oz. Heinz Chili sauce (3 bottles- found in the condiment aisle by ketchup and cocktail sauce)
-          30 oz grape jelly
1.      Mix the ground beef with the onion by hand first. When fully incorporated, then add in the spices and mix that in by hand as well until incorporated.
2.      Make a well in the meat mixture and crack the eggs into it. Carefully using your hands mix in the egg. When fully incorporated add the milk and Worcestershire sauce. After the milk/Worchestershire sauce is fully integrated into the mix, it will now be somewhat loose. 
3. Now add the bread crumbs to the meat mix and using your hands yet again mix in carefully until fully integrated. The crumbs absorb some liquid and will help make the mix less loose.
 

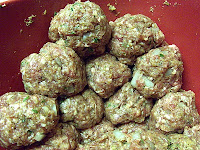
4.      Roll meat mix into 1” balls. Heat a little oil in a pan on medium-high heat. Put meatballs in hot oil and brown on all sides. Drain on paper towels. 

5. Heat chili sauce, drippings from meatball pan, and grape jelly in pot until the jelly melts, stirring often and scraping the bottom


6.      Return the meatballs to the pot and simmer on warm-low for 30 minutes.
*You can make these ahead and freeze. I made the meatballs and cooked them almost all the way through then froze them individually on a cookie sheet before I put them in a bag. Then made the sauce with the pan drippings and froze that separately so I could heat the sauce in a Crockpot and when it was hot finish cooking the meatballs in it (approx. 30 minutes)
I also made cheese sticks with a marinara dipping sauce
  
Makes 24 sticks
-          1 (10 oz) prepared pizza crust, or make a homemade dough
-          1 tbsp butter, melted
-          ½ c provolone cheese, shredded
-          1 tbsp parmesan cheese
-          1 tbsp dried basil
-          ¼ tsp garlic salt
1.       Preheat oven to 425 degrees F.
2.       Unroll Pizza dough onto a greased cookie sheet and brush with butter.
3.       Sprinkle cheeses and spices evenly over the dough.
4.       Using a pizza cutter, cut lengthwise into 12 long strips. Then cut those in half to make 24 strips. DON’T SEPARATE THE STRIPS!
5.       Bake for 10-12 minutes or until light golden brown
6.       Re-cut along each strip and remove from cookie sheet.
***Serve sticks with warm marinara sauce

But nothing compared to his cake. Now, if you know David you know that he has a passion for Star Wars, so naturally I thought: Cake…Death Star…Death Star cake!!!! So, after a whole day of effort we were able to create this masterpiece


If you want to see how my friend and I made this cake then look at her blog, because she is the dessert baking queen! Death Star Cake
I know what you must be thinking, either that we’re insane to make it, or that David has some people in his life that REALLY like him. Enough to put in a whole lot of effort J
The party was wonderful and David certainly enjoyed himself, not just eating good food, but we were lucky enough to be joined by some great friends to celebrate the occasion with.


 This was a big hit at the party and it certainly made David a very happy man J