Fáilte!

The people we choose to share our ups and downs with in life are our best friends, our confidants.

Tuesday, November 30, 2010

Good Ol' American Pie II

To continue the previous post...
4. Preheat oven to 425 degrees F.
5. Heat ½ c butter, flour, ¼ c water, and ½ c brown sugar. Bring to a boil and simmer until it thickens up a little. Pour over the apple filling carefully.
 6. Now onto the topping. Mix the flour, oats, sugar, and nutmeg in a b owl. Drizzle melted butter over the top and stir until it all becomes moist, or almost all of it does. Spread evenly on top of the pie so it covers all of the apples so they don’t burn.
 7. Bake in 425 degree F oven for 15 minutes. Then turn down the heat to 350 degrees F and bake for another 30-45 minutes. Enjoy!
Pie Crust
-          ½ lb (2 sticks) margarine or butter (I used unsalted)
-          2 ¼ c flour (I used all purpose)
-          6 tbsp cold water
-          ½ tsp salt

1.      Mix the flour well with the salt.
2.      Cut the butter/margarine and flour together with a pastry blender, or cut the butter into pea size chunks. Gently mix into the flour with two forks in a fluffing motion.
3.      Sprinkle cold water over the top of the flour mixture, a tablespoon or two at first. Toss this top layer lightly with a fork until large lumps of dough form. Push these aside and sprinkle more water on top, repeat until all is moist.
4.      Gather the lumps of dough together into a loose ball. It shouldn’t be too sticky, but if it’s hard to handle flour hands. Handle with a light touch and DON’T KNEAD IT! Lightly pat the dough with the heel of your hand until you have a smooth ball. Dough that’s handled too much gets tough so be easy on it! Your hand’s heat will start making the butter soft.
5.      Wrap and chill the dough for 30+ minutes.
6.      Preheat oven to 350 degrees F.
7.      Flour the work surface then cut the dough into two pieces. Shape each piece into a hamburger with smooth edges. Keep the work surface lightly floured.
8.      Roll the dough from the center out in a clockwise direction, lifting the rolling pin as you reach the edges. This keeps the dough evenly round and prevents the edges from getting thinner than the center.
9.      Fold the dough into quarters carefully, making it easy to lift without tearing. Place the corner into the center of pan and unfold.
10.  Bake pie crust if necessary for 20-24 minutes in the preheated oven. (Not all pies will require an already baked crust.) Pull out and let cool.
It smelled so good while it was baking I had my mouth watering. By time David got home I was practically chomping at the bit to dig in. So after David got home and we ate dinner I went ahead and served it up. In David’s words, “That is fantastic pie.” How can I argue with that? Which made me think of this fact I found when I googled Apple Pie’s history:
In 1590 Robert Green (1558-1592), an English poet, said he could
think of no greater compliment in praise of a lovely lady. He wrote
the following in his prose called Arcadia, "They breath is like the
steame of apple-pyes."
So I am certainly not the first or only person to love this fruit. Now that I was curious, I was intrigued to find out  more about apples history. A quick search on Google.com told me that the remains of apples are found among excavations at Jericho in the Jordan Valley and are dated to 6,500 B.C. Then dried apple slices were found on saucers in the tomb of Queen Pu-Abi at Ur near Basara, in Southern Iran, linking royalty to the irresistible seduction of apples which was dated to 2500 B.C. And finally in 384-322 B.C. Aristotle was said to have kept death away by holding an apple and inhaling its life sustaining fragrance. Finally and consciously he drops the apple thus releasing his soul. Wow, interesting stuff.

Good Ol’ American Pie

Over the weekend David and I went to a local Farm Market with a couple we’re friends with and had a great time picking out locally grown apples. Since its apple season I thought it’d be a good idea to focus on baking apples so I could put together a delicious apple pie.
I love apples, I have since I was little, and I can remember learning about apples and Johnny Appleseed in first grade and being fascinated. So, when I read some information  about it on www.Wikipedia.com it didn’t  surprise me that since the beginning apples have been associated with love, beauty, luck, health, comfort, pleasure, wisdom, temptation, sensuality, sexuality, virility and fertility. In Greek mythology, Gaia, or Mother Earth, presented a tree with golden apples to Zeus and his bride Hera on their wedding day. Guarded by Ladon, a serpent who never slept, the apple tree was in the garden of the Hesperides, daughters of the Evening Star. These golden apples became involved with many tales of love, bribery and temptation.
So back to my story, at the local Farmers Market I mostly picked out Rome and Stayman apples since they’re good for baking. Earlier in the week I made David one of his favorite desserts, Lemon Meringue pie, and I had extra pie crust so I thought I’d use it for this apple pie. So I gathered all the ingredients and got ready to bake!
This crust recipe came from David’s grandmother, and the pie recipe I tweaked combining ideas from several different recipes. I decided to use the crumb topping (found at http://heavenlyhomemakers.com/crumb-topping-premade)
Apple Pie Recipe


·         Crust (recipe below)
Filling
·         3 lbs apples
·         ½ c sugar
·         ½ c brown sugar
·         1 tbsp cinnamon
·         ¼ c water
·         ½ c butter
Topping
·         ½ c flour
·         ½ c oats
·         ¼ tsp nutmeg
·         2 tbsp sugar
·         3 tbsp melted butter
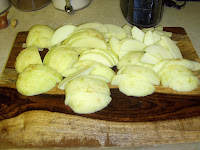
  1. Peel and cut apples into either chunks or slices.

2. Mix with cinnamon and ½ c sugar. Stir and cook over medium heat until tender.
3. While the apples cook roll out the crust and fit into the pie pan (9”). Pour the filling into the pie crust.

Homemade Goodness!

Vanilla Extract
Our friend was generous to gift me a bunch of extra vanilla beans that she had, and since I’ve been cooking/baking a lot recently I decided I’d follow her example and make some homemade vanilla extract. This was especially appealing because many of the recipes I have call for “pure” vanilla extract, not imitation. Only, at the store the “pure” stuff is like $14 bucks for a small container. Waaaay too expensive for the amount I have been using in the last few months.
She gave me a couple different ones like, Madagascar and Tahitian. I had to look up the differences between these types and I found that (according to Wikipedia) Madagascar beans are powerful, dark, full vanilla flavor beans, while Tahitian beans are more fruity and floral.  Then I read that the Mexican variety has just a hint of sweet creaminess. While I was reading up on vanilla beans, I came across the same advice several times: The best way to buy them (most economical) is to get them online. It also said that vanilla is the second most expensive spice after saffron. So, if you’re in the market for v-beans, or you plan on trying out this little home project after you read this post, I would look into buying them on the internet. A lot of the stores I’ve walked in had vanilla beans priced around $3 per bean! No thank you! I will stick to the better prices through online vendors.
FUN FACT: In 1841, a 12-year-old French-owned slave by the name of Edmond Albius, discovered the vanilla orchid could be hand pollinated, allowing global cultivation of the plant (According to Wikipedia.com).
Anyway, so I picked out my beans and started this project, excited and a little giddy with the prospect of what I could make when this was done….
·         A high-proof alcohol like vodka, bourbon or rum.  Go for the 80 proof + varieties.
·         Three vanilla beans per cup of alcohol
1.      Use a sharp paring knife to cut lengthwise down the center of the vanilla beans, leaving about an inch at the top of the vanilla bean uncut.
2.      Put the vanilla beans in a glass jar with a tight fitting lid.  I used mason jars.
3.      Cover the beans completely with alcohol. It’s three vanilla beans per cup of alcohol, so if you use 2 cups of vodka split open six vanilla beans and throw them in the jar.
4.      Tightly cover the jar and give it a good shake.  Store in a cool dry place for two months.  Give the bottle a good shake every week or so, just so you don’t forget all about it. Here are my “before” and “Almost done” pictures. 
                               9/6/10                               10/25/10                                          11/18/10
                                Start                       1 month 20 days later            2 months 2 weeks later

5.      After two months have passed, your vanilla extract should be ready for your favorite recipes.  
*If you have friends who love to bake or are hobby bakers, but they haven’t done this yet, you could put the extract in cute bottles and give them as gifts. They will love this, especially if they are poor student bakers, they will definitely appreciate the upgrade in this ingredient. If you plan on doing a lot of that or if you’re just a maniac baker J then you could get a giant glass bottle and do what this blogger did (I love reading her blog) http://heavenlyhomemakers.com/how-to-finish-your-homemade-vanilla-extract
Now, with the holidays approaching I will have plenty of vanilla extract to make all sorts of goodies. I have a whole list that I will post very soon...